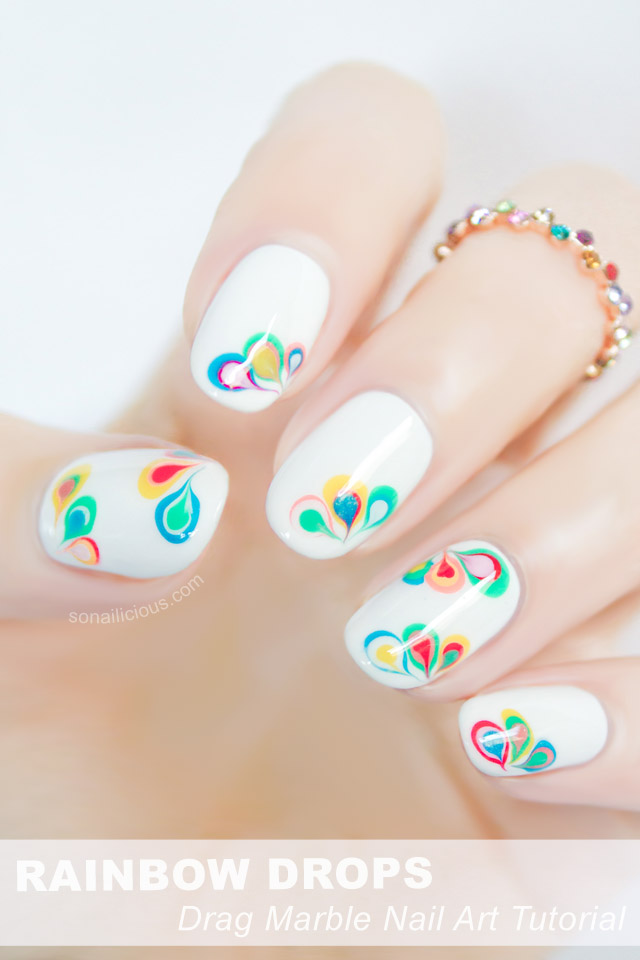
Tutorial – Rainbow Drops Drag Marble Nail Art

This nail design is relatively easy to do. But if this is your first attempt at drag marbling, it’s well worth practicing on a practice wheel or a piece of thick paper first. Once you get comfortable with the technique, there’s plenty of room for experimentation! Drag marbling can be used to create anything from colorful designs.

rainbow-nails-drag-marble-nail-art

Supplies:

  • 6 opaque, well-pigmented nail polishes in rainbow colors
  • Opaque white nail polish
  • Dotting tools
  • Needle
  • Top coat & base coat

drag-marble-nail-art-tutorial1

How To:

  1. Apply 2 coats of opaque white nail polish on all nails. Allow it to dry for 5-10 minutes but don’t let it dry completely.
  2. Now, work one nail at a time. You’ll need to work quickly so first prepare all the tools and the colored polishes you’ll be using to create the rainbow drops. Put generous drops of colored nail polishes on a piece of paper. Put the dotting tool and needle next to them. Now, paint one nail with a 3rd layer of opaque white polish and quickly add colored dots of overlapping polish as pictured.
  3. With a needle, gently drag the colorful dots in one direction. Do not use a lot of pressure, your aim is to drag the dots not to scratch your nail.
  4. Repeat steps 2 & 3 on all nails.
  5. Clean around the cuticles. If required and seal your design with a generous layer or two of quick drying top coat. Allow sufficient time for your design to dry.

cute-rainbow-nails

rainbow-nails-marble-nails

Will you give this a try? Let us know in the comment below!

Source: sonailicious.com

Why Use Cuticle Oil?

Cuticle oil is used to moisturize the cuticle, skin and nail area. It can protect the cuticle and nail against damage and improve the health and appearance of the cuticles and nails. Cuticle oil should not be used as a first-line of defense against dryness, but rather to fix extremely dry, cracked nails. Made of natural, rapidly absorbing vegetable oils, cuticle oil can also contain vitamins and citric acid.

cuticle-oil

Protect and Repair
Cuticle oil can help protect and repair damage to the cuticles. When cuticles are exposed to excessive cold, sun, chlorination, salty or soap water or other environmental conditions that lead to dry, chapped skin, the cuticles can be also become dry, chapped, and damaged. Similarly, picking at the cuticles, typing, folding laundry, brushing hair and cooking can all cause damage.

Stronger-Nails-Kelly-before-after

Moisturize and Pamper
The main purpose of cuticle oil is to deeply moisturize not only the cuticle, but also the skin and surrounding nail area. Cuticle oil helps increase circulation in the nail bed and can stimulate new nail growth. When cuticles or the surrounding nail are extremely dry and cracked, to the point of separation of the nail area from the cuticle, the oil provides quick repair and protection. The oil deeply moisturizes the area, repairs the nail, stops the cracking and eventually allows the nail to reattach.

Dos and Don’ts
Before using cuticle oil, regular skin moisturizing creams should be used. If you apply the oil too often, your cuticles can become dry and cracked when you discontinue use. Cuticle oils should be used only when the nails are extremely dry.

Common Infusions and Ingredients
Cuticle oil must absorb quickly and should be thin, not thick. Common cuticle oils include any one or a combination of flaxseed oil, wheat germ oil, apricot oil, safflower oils, lavender oils and jojoba oils. Some of these oils may be infused with citric acids and vitamins. The citric acids make the oils absorb quickly. Other ingredients may include vitamins, such as vitamin E, which is an anti-oxidant.

How to Apply
Only a small amount of cuticle oil is necessary. Cuticle oils are potent and small quantities can provide the deep moisturizing necessary. Cuticle oils can be brushed on, similarly to nail polish, or they can come in pen-like applicators. Roller ball applicator provides a neater and best application.

Source: livestrong.com

Nail-Art Brush Cleaning 101 – Part 1

You recently invest some nail-art brushes and start your nail-art adventure. After a couple painting and drawing session, now what…?

Cleaning and caring nail-art brushes isn’t hard but can be a hassle if doing it wrong. Let’s see how Alli from thedailyvarnish makes her nail-art brush cleaning an easy task!

What you need:

  1. Dirty nail-art brushes (obviously….). This method is to remove nail polish from nail art brushes (not acrylic paint, etc).
  2. Nail polish thinner. My favorite is Orly Nail Lacquer Thinner. But any nail thinner will work! Sally Beauty has a generic Beauty Secrets thinner that’s very affordable.
  3. Some kind of disposable plastic cup or plate. Make sure it’s plastic and not paper. The paper will just soak up the nail polish thinner.
  4. A piece of paper.

How-to-clean-nail-art-brushes-940x1000

How to (easiest when the nail polish is till wet….though it will work with dried polish):

  1. Add 2 to 3 drops of nail polish thinner to a plastic surface.
  2. Dip the brush in the nail polish thinner and swirl it around.
  3. Wipe the brush on the piece of paper.
  4. If there’s still color on the brush repeat the above steps.

Nail-Art-Brush-Before Nail-Art-Brush-After

Once all the color is gone, Alli use the paper prepared folded over to reshape the brush. The paper will also soak up any excess nail polish thinner.

After that the brushes is put back in their normal spot. They’re ready to go for next time!

A couple of things not to do:

  1. Do not use acetone nail polish remover on your nail-art brushes. This will weaken the glue and eventually the bristles will fall out. Basically, doing this will slowly ruin your brushes. And no one wants that.
  2. Do not run the brushes under water after cleaning the brushes with nail polish thinner. This will cause the nail thinner to ball up and get stuck in the bristles.
  3. Use paper or cardboard to soak up the extra thinner is recommended because using a paper towel (or the like) will leave lint in the brush.

An alternative method (that’s not really recommended….)

If you’re in a serious pinch you can use clear nail polish. This will take the color out but once the brush dries it will be rock hard. You’ll still need to follow up with nail thinner.

Source: thedailyvarnish.com

Tips to Become a Nail Stamping Expert – Reverse Stamping

For a unique way to wear your stamping design, try reverse stamping and/or polish decal. It is a fun method to express your creativity and minimize the error while transferring image from stamper onto nails. Here’s a more detail post about reverse stamping/polish decal.

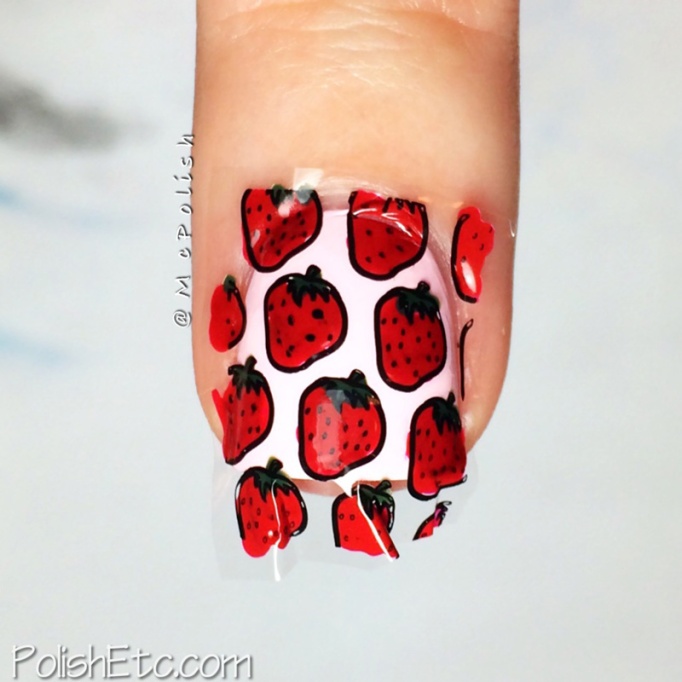
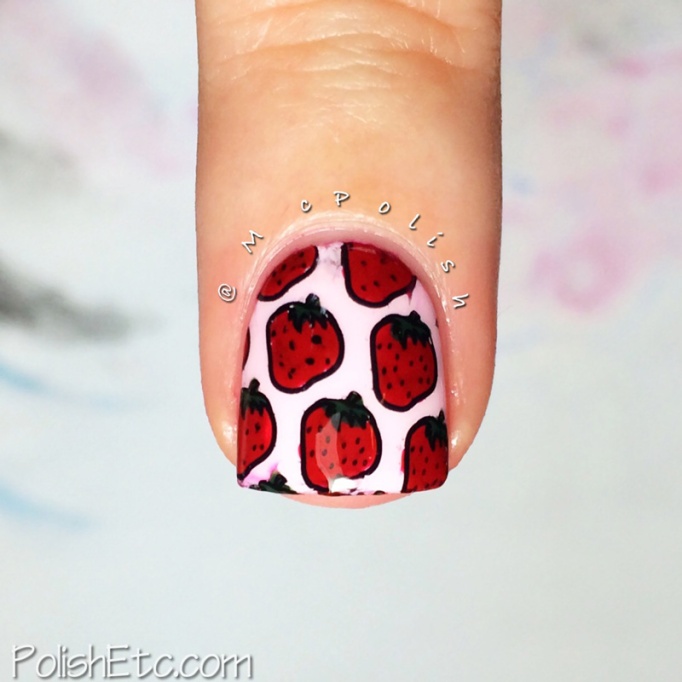
Painting a square of clear polish (make sure it covers your nail if it’s full image) onto a sandwich bag. Once it is dry, stamp your image onto the clear polish, wait dry and color it in.  Once that is completely dry, you can gently peel the decal off of the plastic.

winstonia nail polish decal 1Plate used: Winstonia First Generation Plate W118

Amy from @mcpolish recommends trimming the decal down so there is not a ton of extra polish you will need to clean away.

winstonia nail polish decal 2

Apply a tiny amount of clear polish to your painted nail and lay the decal onto it. Press it firmly down and smooth out the decal to the edges of your nail.  This small bit of clear polish and smoothing out will prevent air bubbles from becoming trapped under the decal.

She also prefers to clean up the overhanging bits of decal before applying top coat. Otherwise, sometimes the extra decal folds over onto the top coat and ruins your design.

winstonia nail polish decal 3

When using large images for decals, you can cut them in half and use them on even more nails. Again, random placement makes it easy to hide imperfections.

To prevent smearing your design with top coat, wait until the stamping has dried and float a large amount of top coat on the nail with as few strokes as possible. She will stamp all 10 nails, then clean up all ten and once that is done they will be dry enough for top coat.

If you have done this reverse stamping before, what’s your verdict? Comment below to let us know!

Source: Nail It! Mag

Nail Polish Bottle Flower Bud Vase

DIY nail polish bottle 1

DIY nail polish bottle 2

Add some colors to your room by up-cycling empty nail polish bottles into these colorful flower bud vases!

Supplies:

  • empty or almost empty nail polish bottle;
  • plastic cup (disposable one);
  • spray paint (any color you like);
  • button;
  • newspaper;
  • yarn or twine scissors;

DIY nail polish bottle 3

Steps:

  1. Peel off any existing labels from the nail polish bottle. If it does not remove easily, try soaking it in warm water or check out this video for additional tips.
  2. Pour any remaining nail polish from the bottle into a plastic cup and toss out.
  3. Place the bottle on newspaper sheets to protect your workspace and spray paint until it is completely covered. A few light coats should do the trick. Follow the manufacturer’s directions when painting and always work in a well-ventilated area. Let dry.
  4. Run the button through your yarn until it reaches the center of the yarn. Wrap the yarn around the top of the bottle. Tie a knot at the back of the bottle or behind the button and cut off any excess yarn.
  5. Before adding water or a flower bud to the vase, make sure the nail polish inside the bottle is completely dry. You may need to let it dry overnight. Dab a qtip or toothpick inside to check before proceeding.

DIY nail polish bottle 4

Isn’t this DIY project easy and cute? Will you give this a try? Let us know in the comment below!

Source: cremedelacraft.com

Tips to Become a Nail Stamping Expert

Our friend @mcpolish at PolishEtc.com recently made to Nail It! Mag with her pro stamping skills.  Let’s dive into her tips and tricks to become a stamping expert in no time!

1. Look for a good stamping polish. Usually polishes that will cover your nail with one coat will stamp well. Metallic polishes and some matte polishes work very well.

2. Clean the stamping image after before each use with pure acetone. This will get all of little bits of old polish out and ensure a crisp image.

3. When using a large squishy or sticky stamper, pushing your nail straight into the image instead of rolling it over your nail works the best.

nail_stamping_tips_10Large Stamper is available here: http://www.winstonia.com/nail-art/stamping-kit.html

4. To clean the large stamper without damaging it, use a piece of packing tape to pick up all the left over polish bits.

5. Old gift card/credit card is preferred by @mcpolish. Hold it at a 45-degree angle to the plate and scrape lightly.

6. If you are using an image with a large open space to stamp, trying scraping the image both left to right and up and down. This will spread the polish around the large space more evenly.

7. Make it easy and just do an accent nail when you are starting out with your stamping adventures.

Photo-Nov-17-4-51-36-PMPlate used: Winstonia First Generation Plate W107

9. Mix and match abstract stamps on each nail of your manicure. Try turning the stamper in different ways on each nail to make it look unique. Mistakes are much less noticeable when each nail is different.

10. Elevate your manicure by stamping multiple colors of the same stamp on each nail for a layered effect.

11. Reverse stamping is a fun way to get even more colors onto your nails. It works well for small images. When reverse stamping, color in your image right on the stamper. Once it dries, apply a tiny bit of top coat to your painted nail. (Like dry brushing). Then stamp the colored-in image right on your nail and seal it in with top coat.

More about Reverse stamping by @mcpolish will be discussed in our next post. Can’t wait? Here’s a pictorial by @nailstamp4fun using our Dino plate W220.

Source: Nail It! Mag

15 Resolutions to Make 2015 a Better Year

e8fa92870b1006be45481389c141410d

Make more money, lose weight, and live by the Golden Rule. These are some of the most popular New Year’s resolutions around, but the formula for a better future is variable. For some people, learning to manage stress is a more constructive goal than shedding a few pounds. For others, the New Year might be best spent reconnecting with old friends, or taking more time off work to recharge.

Come Jan. 1, one in three Americans will vow to make changes that better their lives. Most, however, will collapse long before reaching the finish line. About 75 percent of people who make New Year’s resolutions are on target a week later, but that figure drops to less than 50 percent by July, according to Health.com.

That doesn’t mean New Year’s resolutions should be abandoned before they even have the chance to come to light. It’s time to knuckle down. In the words of the venerated Oprah Winfrey, “Year’s end is neither an end nor a beginning but a going on, with all the wisdom that experience can instill in us. Cheers to a new year and another chance for us to get it right.”

Here are 15 habits and behaviors to adopt in 2015 to make this year better than the last.

1. Become a better time manager. Time is an invaluable asset and should be spent wisely. Learning where to expend energy, and where not to, has innumerable benefits, including less stress, more free time, fewer mistakes and improved production.

Forbes writer Jeff Boss suggests spending a week making a list of everyday distractions – the things that occupy time throughout the day but serve little purpose. Then eliminate them, or set aside an hour every day for tending to those diversions.

2. Manage your debt. The peace of mind that comes with taking control of debt can do wonders for overall health. The first step to getting on track financially is to get organized. Make a list of all debts, including minimum monthly payments and due dates. Create a bill payment calendar to remind you which payments are due when.

Figure out what order to pay off your debts. Perhaps you start with the debt with the lowest balance first. Credit card debt is often a good place to begin, according to About Money.

f1c2160a659b64cf179f73f92db13fc0

3. Go back to school. Furthering your education can be a great way to grow intellectually, find a new career path, or discover a sense of purpose. “Becoming a student again is a chance for you to reconnect with yourself,” Rebecca Little, a massage therapist in Boulder, Colorado, who attended Boulder College of Massage Therapy at age 45, wrote in 2009. “It is the opportunity to explore, find and create new interests and passions. You are able to let your guard down and become a student again, rather than always feeling the pressure of being the teacher, boss, mother, father, provider, mentor, etc.”

4. Make an effort with co-workers. We spend countless hours with the people we work with, but few of us take the time to get to know our colleagues. Building friendships in the workplace can actually relieve stress or tension in the office, according to the San Francisco Gate.

5. Be more mindful. Downtime can make many people uneasy – all those errands aren’t going to run themselves! – but getting off the hamster wheel every now and then is a must. “Having unknowns in your schedule and being OK with that can force you to really focus on what’s at hand,” according to Life Dev.

What it comes down to is learning to live in the moment, what some psychologists call “mindfulness.” Many of us schedule our every move, and then obsess over sticking to the plan. Few people allow room to improvise or to simply be still. Learning to be mindful – putting your attention on the present, rather than thinking about the past or planning for the future – can relieve stress, improve sleep, lower blood pressure and improve overall well-being, according to Harvard Health Publications.

787ba91bdb484dd382a5e04ae98b7dfa

6. Be a better listener. Cultivating strong professional and social relationships, as well as improving memory, are just some of the advantages of being a good listener. Eye contact and positive body language can go a long way in a conversation. Listening will help you better show support for others, resolve problems and build rapport.

7. Quit smoking. Smoking cigarettes is the leading cause of preventable deaths in the U.S. Each year, more than 480,000 deaths – about one in five – are linked to smoking, according to the Centers for Disease Control and Prevention.

Smoking increases the risk of heart disease or stroke by two to four times, lung cancer in men by 25 times and lung cancer in women by 25.7 times. Make 2015 the year to drop the bad habit. Start by setting a quit date, spread the news to family, co-workers and friends, and discard all cigarettes, lighters and ashtrays from your home, car and office. Most importantly, talk with a doctor about developing a quitting program that’s right for you.

8. Log in some volunteer hours. Volunteering is a great way to make a difference in someone else’s life, build self-confidence, develop new skills, foster friendships and cultivate a sense of purpose. Find something you enjoy doing, and commit a few hours a week or a month to giving back.

d25e6eac73427212e857488080ec5267

9. Reconnect with estranged friends or family. Holding grudges can be toxic. It’s time to exorcise the old demons that foster ill will toward others. The first step toward mending a broken relationship is to own up to a mistake. “The easiest part of any relationship breakdown is to place blame on the other of how they wronged, hurt, offended or betrayed you,” Mike Wasilewski and Althea Olson of Law Officer wrote in 2012. “What’s harder, but more crucial, is to look in the mirror first and foremost in order to take ownership of what you contributed to the conflict.”

The next step is to offer up some solutions. Simply calling attention to a problem doesn’t do much to change the past. “The plan may or may not be elaborate,” Wasilewski and Olson wrote. “It may be as simple as pledging to get together in person or by phone quarterly to catch up, a conscious effort to include them on your holiday card list or making time to stay connected via social media.”

Finally, give it time. Mending past wrongs can be emotionally taxing. Don’t try to rush the process.

10. Eat better. Reducing the risk of heart disease, boosting energy, fighting disease and improving mood – these are just a few of the many benefits of having a healthy diet. It’s easy to get into a routine of eating out. Making a run to the deli or burger joint for lunch during work might seem convenient, but all of those calories end up costing more than an hour’s wage. Make a point to pack your own lunch for work, a lunch of fruits and vegetables and protein.

4b84072906c4da7001df743a63e7a0a8

11. Try new foods. The adage that variety is the spice of life holds true. Exploring new culinary traditions can be fun, engaging. Get adventurous! Make a point to try a new recipe once a week. Learning to give something new a try is a lesson that will take you far in life.

12. Get enough sleep. The average adults needs between seven and eight hours of sleep a night, according to Mayo Clinic. It’s one of the best ways to keep your body and mind in tip-top shape. A good night’s sleep has been linked to less stress, increased alertness, reduced inflammation and may even prevent certain cancers.

b1982846e5dbe9bca22fe6e310ffe8b8

13. Make time for exercise. Just 20 minutes a day of moderate physical activity can boost energy, improve mood and keep certain dangerous health conditions like high blood pressure at bay. Walking, swimming and mowing the lawn fall into the category of moderate exercise. Exercise doesn’t have to be tedious. In fact, it can even be fun. Take a dance class, go hiking or join a local sports team to get the blood flowing.

Untitled-6

14. Take a trip. The benefits of taking a vacation are many and can contribute to a positive attitude and improved emotional health, according to USA Today. “Vacation should be really defined as a time when we can really turn off those tech work savers and just relax and have fun,” Robert R. Butterworth, a Los Angeles psychologist, told ABC News. “If you have a job that’s very creative and you don’t take time off you hit a wall and you need a change. The break will allow you to refresh your brain cells.”

f78e622168101e7bdbf19d1de347054e

15. Be kind to yourself. Above all else, remember that it’s OK to make mistakes along the way. Be kind to yourself – the process of making improvements to our daily routines is a marathon, not a sprint. Self-love can go a long way toward a healthier lifestyle.

2f7fc5f87732852d1046c51bbd48ff82

“Emotions that are cultivated in the mind often manifest themselves somewhere on the human body,” according to Tiny Buddha. “A dull ache in the stomach can translate to a gut full of worries.”

Adapted from: ibtimes.com